Wednesday, December 16, 2015

Cooper (II) Chloride Lab

Day 1
To start the lab we took the mass of a baby food jar then added 4.00grams of Copper (II) Chloride to the jar and 50.0grams of distilled water. We stirred the solution until it was completely dissolved. After polishing off a nail with steel wool we placed it in the container and let it sit.
Day 2
We pulled of the remainder of the nail out of the jar. Then, we slowly poured out solution careful to not lose any copper product. We did the same two more times after washing it with HCl and more distilled water. We set the jar with copper out to dry. To finish off we took the ending mass of the nail.
Day 3
We recorded the mass of the baby food jar with the copper and then subtracted the previous mass of the baby food jar with no solution to find out the mass of product we had. Then it was time to start calculations. A single replacement reaction took place place but the charge of iron was unknown so we had to create a balanced chemical equation for each possible charge of iron (2+ or 3+) and find theoretical yield of each then use our percent yield formula to calculate which had the highest percent yield; therefore, telling us the charge of the iron. After calculations were done, it was found that iron with a 2+ charge created a percent yield above 100% which is impossible, so the charge on iron in or reaction was 3+.
Here are some pictures of the lab:

Sunday, December 13, 2015

Percent Yield

The basic formula for percent yield is:
Use your knowledge of stoichiometry and limiting reagent (with the help of my two previous blog posts) to solve for theoretical yield. Actual yield comes from the results of your lab.
The following practice problems  can help solve for percent yield:  http://tmlimitingreagents.weebly.com/percentage-yield-and-actual-yield-practice-problems.html

Saturday, December 12, 2015

Limiting Reagents

We learned two approaches to solve limiting reagent problems:

Approach 1:
1. Balanced chemical equation
2. Convert all info to moles
3. Calculate the mole ratio from the given info. Compare calculated ration to actual ratio.
4. Use the amount of limiting reagent to calculate the amount of product produced.
5. If necessary, calculate how much is left in excess of non-limiting reagent

Approach 2:
1. Balanced chemical equation
2. Convert info to moles
3. Use stoichiometry for each individual reactant to find mass of product produced
4. The reactant that produces lesser amount is the limiting reagent
5. The reactant that produces larger amount is excess reagent
6. To find amount of remaining excess reactant, subtract the mass of excess reagent consumed from total mass of excess reagent given.
**This approach is the one I prefer to use

The following video and link can be used for extra practice:
https://www.khanacademy.org/science/chemistry/chemical-reactions-stoichiome/limiting-reagent-stoichiometry/v/stoichiometry-limiting-reagent
http://www.chemteam.info/Stoichiometry/Limiting-Reagent.html

Wednesday, December 9, 2015

Stoichiometry

Solving problems using stoichiometry uses a balanced chemical equation. Then you start with what is given. Convert grams of the given substance and convert to moles using the periodic table, then multiply by the mole ration from the balanced chemical reaction, and finally back to grams using the periodic table again. Here's a chart to map it out a bit better:

The following video can help explain more: https://www.youtube.com/watch?v=SjQG3rKSZUQ

Thursday, December 3, 2015

Reactivity Series Lab

In this lab we watched different redox reactions occur and then solved for their net ionic equations. We were able to use aqueous solutions of water, hydrogen chloride, copper sulfate, and river nitrate. With those we reacted each with solid forms of lead, copper, calcium, magnesium, zinc, and tin and watched to see if any sort of chemical reaction took place. Using our results we had to create our own reactivity series.
In order to predict their solution we had to use a reactivity series table that showed us whether the single replacement reaction would occur. Here is a link to a site that describes this table: http://www.bbc.co.uk/education/guides/zqjsgk7/revision
Here are some images showing some of the reactions that took place and others that had no reaction at all:


Wednesday, December 2, 2015

Redox Reactions

Redox reactions consist of electrons being transferred from the metal to the nonmetal. If a species loses electrons, it is said to be oxidized, and this is considered the reducing agent. If a species gains electrons, it is said to be reduced, and this is considered the oxidizing agent. An easy way to remember this is from the acronym OIL RIG. It stands for: Oxidation is loss; reduction is gain. Here's a visual for it:
http://www.ict4us.com/r.kuijt/images/en_oxidation_reduction.jpg
The first type of redox reaction we learned of was redox single-replacement reactions. It is set up as a single element reacting with a compound.. For this type of reaction, it it good t remember that "like attacks like". In this way, metal attacks a metal, while a nonmetal attacks a nonmetal.
The second type we learned of was synthesis. These reactions happens when two or more reactants come together and form one product. So A+B creates AB. Decomposition is the exact opposite of this, so there is one reactant breaking down to two or more products. This would then be AB creates A+B. 
The final type we talked about was combustion reactions. In this type of reaction, when a hydrocarbon reacts with water, the products are always water and carbon dioxide. Here is an example:


Acid Base Reactions

These types of reactions will produce a water and a salt, and the water produced is the driving force of this reaction.
Here's a small example of what it would look like:

http://lrs.ed.uiuc.edu/students/mihyewon/images/HClNaOH.gif
Within the acid-base reaction, there is a possibility for both strong acids and bases, as well as a weak version of both. Strong acids produce H+, protonate completely, HCl, HBr, HI, and are the strongest if the oxygens outnumber the hydrogens by 2 or more. Strong bases contain an -OH- anion, disassociate completely, all group 1 and 2 metals plus the -OH anion are the strongest. Weak acids do not protonate completely, are not on our memorized list Weak bases do not disassociate completely, are not on our memorized list
A good thing to remember is when looking at the molecular diagram, to always look for the parents. If there are more parents, this means it is weak, or if there are less, it is strong. 
http://mgh-images.s3.amazonaws.com/9780073402680/5120-4-3IRC1.png
Here's a link to walk through the solving of these problems: http://science.widener.edu/svb/pset/acidbase.html
Here's a video for further explanation: https://www.youtube.com/watch?v=ANi709MYnWg

Tuesday, December 1, 2015

Double Replacement Reactions

In a double replacement reaction the driving force is the formation of a solid. The reactants which must be aqueous and ionic undergo disassociation, the ionic compounds break apart into cations and anions. The cations then replace eachother and create two new compounds, one being a solid. 
To know whether a solid is produced or not, you will need to know the solubility rules.
Some extra practice can be found at: http://www.chemteam.info/Equations/DoubleReplacement.html

Describing Chemical Reactions

Clues a chemical reaction has occurred are color change, formation of a solid, bubbles, and heat is produced or absorbed. The anatomy of a chemical equation is:
Subscripts tell us number of atoms of each element in a molecule. Coefficients tell us the number of molecules. In a combustion reaction, reaction with oxygen that produces a flame, the product is always CO2 + H2O. To balance these equations you must follow the CHO method. Balance in order starting with Carbon then Hydrogen then Oxygen. The following link can help describe the CHO method a bit more http://www.onlinemathlearning.com/balance-chemical-equation.html

Tuesday, November 17, 2015

Hydrated Compounds

 
Hydrated compounds have water as part of their chemical formula. Anhydrous compounds have had their water removed from them. The formula of a hydrate is written a bit differently. An example of this is
The following video provides a good explanation on how to solve hydrate problems. https://www.youtube.com/watch?v=KCuYQ3ayFNM Practice problems can be found at http://www.chemteam.info/Mole/Determine-formula-of-hydrate.html
 

Monday, November 16, 2015

% Composition and Empirical/Molecular Forms

We discussed percent composition in class last week. These problems are solved by simply taking the mass of each element in the compound and dividing it by the mass of the entire compound and then multiplying it by 100. You can then use the percent composition of that element and calculate the mass of it in a certain size sample by multiplying the % comp by the mass of the sample. An example of this can be found in the following video. https://www.youtube.com/watch?v=lywmGCfIUIA
We also talked about empirical form vs. molecular form. Empirical formula is the lowest number ratio, but molecular gives the actual number of atoms in the compound. Below is a chart to help show the differences.
To find the empirical formula we used this process: 
Examples of this can be found on the following link. http://www.chemteam.info/Mole/EmpiricalFormula.html
Using empirical formula you can find the molecular formula by taking gram formula mass and dividing it by the empirical formula mass to get a whole number, and then distributing it to the empirical formula. Some practice problems can be found on the following links. http://www.chemteam.info/Mole/Empirical-MolecFormulas.html and http://chemistry.about.com/od/chemistry-test-questions/tp/Molecular-Formula-Practice-Test-Questions.htm


Wednesday, November 11, 2015

Formula of a Hydrate lab

We completed a lab on Monday in class working with hydrates and anhydrous compounds. To start, we measured out about a thumb width of hydrated crystals into a test tube and took its mass by weighing by difference. Using and bunson burner, we heated the test tube gently for a few minutes and then on medium heat for 5-10 minutes or until it was completely white and allowed it to cool before taking it's mass once more. We reheated the test tube again to ensure all water was driven off and took the mass one last time after it was cooled. Using the data we determined the formula of the hydrate.

Sunday, November 8, 2015

The Mole

The mole is expressed as 6.02 × 10²³ and is a unit of measurement. These problems can be solved using the mole road map:
When converting from mass to moles or vice versa, use atomic mass off the periodic table for elements and molar mass for compounds. The following link incudes a video for more explanation and examples of using the road map: https://www.youtube.com/watch?v=mBVL0PHPrhg


Thursday, October 29, 2015

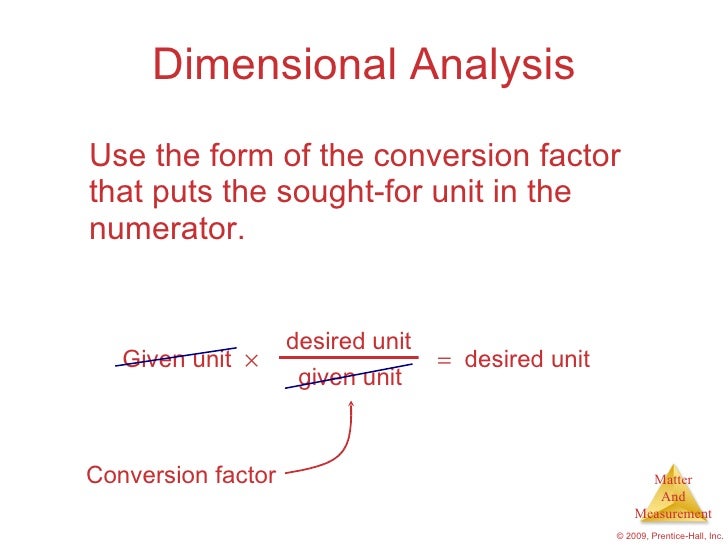
Dimensional Analysis

Dimensional Analysis is used to convert one quantity to another.
 
 
The most important thing when using dimensional analysis is knowing your conversion factors! Details and extra practice can be found on the following website and video: http://www.alysion.org/dimensional/fun.htm https://www.youtube.com/watch?v=lAan6L9UjsE

Measurement

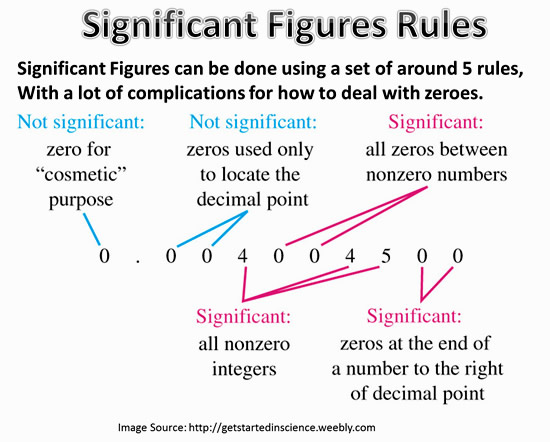
We explored concepts of Significant Figures in class. This refers to the figures that were measured. The easiest way to explain is through the following picture:
This is applied in problems with when you are multiplying and dividing because the answer has to be rounded to the smallest number of sig figs. The following link is extremely helpful in explaining sig figs and even includes links on the sides for explaining sig figs in addition and subtraction, and multiplication and division.  Also check out the extra practice links at the top of the videos, as they are extremely helpful! https://www.khanacademy.org/math/arithmetic/decimals/significant_figures_tutorial/v/significant-figures


Classification of Matter

In class, we learned about classifying matter. We covered topics such as intramolecular which is ionic, covalent, metallic where the break changes the identity of the metal, and intermolecular associates the neighbors and includes hydrogen bonds, and when broken, the phase changes. For a clearer explanation of this you can watch this video: https://www.youtube.com/watch?v=GnswLP4t6d0 Another thing we learned about is physical property changes, they can be observed without changing identity; whereas, chemical property changes can only be observed when a substance changes into another. Check out this link for more information: http://antoine.frostburg.edu/chem/senese/101/matter/faq/physical-chemical.shtml We also covered separation techniques with focus on filtration, distillation, and chromatography. These techniques along with a little info about the classification of matter can be found on the following video: http://study.com/academy/lesson/states-of-matter-and-methods-of-separating-mixtures.html I also found a very helpful chart for classifying matter.


Wednesday, October 7, 2015

Aspirin Lab Day 2

Day 2 consisted of isolating the product. We did this by using a Buchner funnel and filter paper as shown in the picture below.
Day 2 Set-Up

We emptied the contents of our beaker from day one that crystalized over night into the funnel and rinsed it with ice cold water then let the water suction out for a few minutes. We used tweezers to remove the filter paper with the product on it and set it in a watch glass to transport to its drying area.


Aspirin Lab Day 1

We started the process of making aspirin by combining 5g of salicylic acid, 7mL of acetic anhydride and 8 drops of concentrated sulfuric acid. Then, it was time to heat the starting materials. We made a hot water bath and boiled for 15 minutes. This is what the hot water bath set up looked like:

When the 15 minutes were up, we allowed the flask to cool for 3 minutes on a hot plate and added 15mL of ice cold water to the flask and swirled it to mix contents then set it up on the lab bench to crystalize over night.


Thursday, October 1, 2015

Test

We have just completed our unit and took the unit test. The test covered a number of topics that I have been discussing in my previous blogs such as atomic theories, subatomic particles, calculating average atomic mass, radioactivity, and fission and fusion. I was very nervous for this test because I wasn't familiar with any topics beforehand and the content seemed harder than the last unit, but I feel like I did well and can only hope for the best results now! The part of the test that confused me the most was calculating percent abundance since I did not review that as much as I should have before the test. I found a link to help me review for the next test in hopes I do better on that next time. These are some practice problems with embedded videos for extra explanation when needed: http://www.chemteam.info/Mole/AverageAtomicWeight.html

Tuesday, September 29, 2015

Half-Life

The half life of a substance is the time it takes for the sample to decay into a stable form. This is shown in the following graph.

The following video is very helpful to better understand how to calculate half life: https://www.youtube.com/watch?v=DfXYy10Vqlo

Radioactivity

We learned about radioactivity and the three types of decay: alpha, beta, and gamma. The following chart is a summary from my notes.

 A video to help explain the calculations behind tracking decay series is https://www.khanacademy.org/science/chemistry/nuclear-chemistry/radioactive-decay/v/alpha-beta-and-gamma-decay

Tuesday, September 22, 2015

Beanium Lab

We completed a lab in class today to deepen our knowledge and practice our skills of solving average atomic mass. The scenario we were given had us conducting follow up experiments on a newly discovered element, "Beanium", which uniquely has atoms that are very large and isotopes can be sorted by hand. My lab partner and I counted total number of atoms in the sample, then sorted the atoms by isotope, counting the number of atoms for each isotope, and determined mass using a scale. Using this information, we calculated average mass for each isotope by dividing the number of atoms for each isotope by the total mass of each isotope. After, we calculated the percent abundance by dividing the number of atoms for each isotope by the number of atoms on the whole sample. We then filled in the average mass and percent abundance of each isotope into the equation for average atomic mass. This is found in an earlier post of mine, Isotopes, it also provides a little more background information about the whole process of finding atomic mass.
Materials for lab

New Project

We were assigned a new project to create an online database tracking the elements in the stars. Astronomy has never been something I was very interested in, but I hope I can learn some things and gain a little more interest and appreciation for it all at the end of this project. Some links I uswede to help me find the information are: http://www.astronoo.com/en/brightest-stars.html, http://www.astronoo.com/en/stars.html, and http://www.umop.net/spctelem.htm. These links help me first to identify and star and it's stellar classification, then to identify the chemical make-up, and last to find the visual spectrum of the most abundant element.

Isotopes

Monday in class, we learned about isotopes. Isotopes are two or more forms of the same element containing the same number of protons, but different number of neutrons. Neutrons are responsible for giving an element it's mass; therefore, isotopes have different atomic masses. To calculate average atomic mass of all isotopes for a particular element, the mass of each isotope is multiplied by it's percent abundance and then added together. For a deeper explanation and more clarification on the topic, I found the following video very helpful. Atomic Mass: Introduction

Monday, September 21, 2015

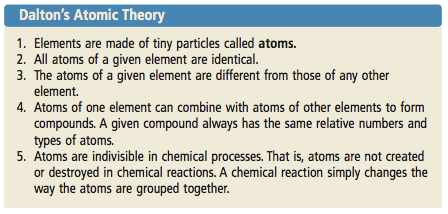
Atomic Theory


We started our new unit today about Atomic Structure and Radioactivity. We began exploring some theories about the structure of the atoms and the experiments done to prove these theories.
Thomson discovered the electron by using a cathode ray tube to show atoms of an element emit particles with a negative charge. He made the chocolate chip cookie model

 
Rutherford discovered the proton through his gold foil experiment and proved the presence of a positively charged center in an atom. A visual representation of this is:


Tuesday, September 15, 2015

Pre-Test

Today I took a pre-test for the new unit about Atomic Structure and Radioactivity, I noticed I struggled a lot on all the questions and I knew nothing about what was being asked. However, this makes me excited about all the new things I can and get to learn about in the upcoming unit. I feel like this unit will be more difficult than the previous unit about nomenclature because I had a little bit of background knowledge before going into that, that I feel I don't have for this unit.

Monday, September 14, 2015

Naming Acids


I recently learned about naming acids. I found a very helpful flowchart to easily follow along and name them.


Naming Compounds

I learned how to name types 1, 2, and 3 binary compounds. I found this very useful flowchart that with a few easy steps can help me name compounds.
Some important notes to remember are when naming Type 1 are, the cation (metal) is named first and uses it's element name. The anion ( non-metal) is named second and the ending of the element name is removed and replaced with the suffix -ide. With type 2 naming, it is important to remember that the roman numeral following the transition metal represents the charge and not the number of atoms. Type 3 naming the first element is named using full element name, but the second element is named as an anion. The chart below can help you with prefixes.
 

Be sure to make sure that the words agree such that if there is oo, drop the first o and same with ao, drop the a.
 

Thursday, August 20, 2015

About Me

My name is Lauren Freesmeier. I am a sophomore at Francis Howell High School. My favorite foods are mac n' cheese and pizza. I enjoy playing soccer and tennis. When I am older, I want to do something in the business field.